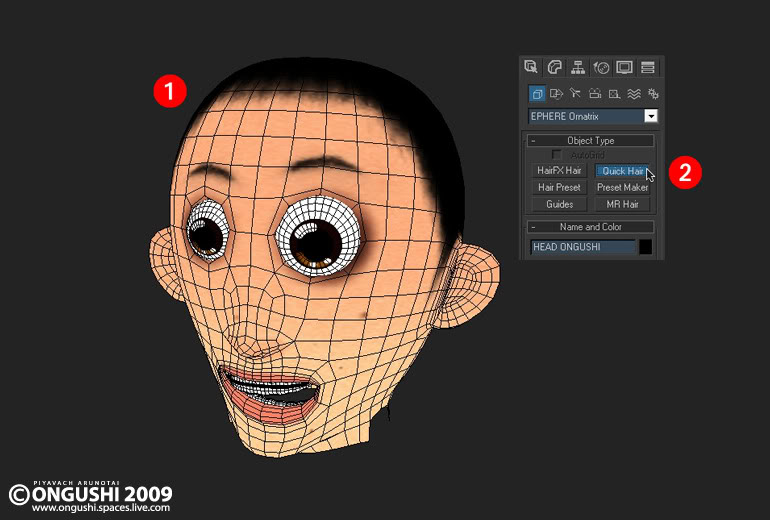
3. จิ้ม Quick Hair ไปที่หัวเกรียนๆที่เราสร้าง เราจะได้ขนเม่นขึ้นมาทั่วโมเดล
3. Select Quick Hair to the head that you created.
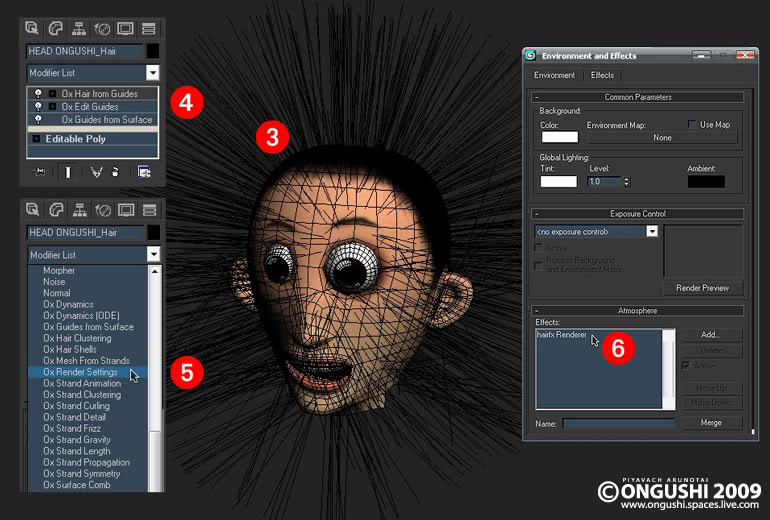
4. ใน modify stack จะได้ชุดคำสั่งตามภาพ
4. When you see in Modify Stack, you will get the list as shown in above picture.
5. เพิ่มคำสั่ง Ox Render Setting อีก 1 คำสั่งจาก Modifier List เพื่อเปิดการตั้งค่าการเรนเดอร์เส้นผม
5. Add menu Ox Render Setting by click at Modifier List to set up value of rendering.
6. เปิด Effects: hairfx Renderer จาก Environment & Effect เพื่อเปิดการเรนเดอร์เส้นผมที่เราสร้าง
6. Then use Effects: hairfx Renderer by open from Environment & Effect for rendering the created hair.
7. ไปที่คำสั่ง Ox Guide from Surface และคำสั่ง Ox Hair from Guide
7. Go to Ox Guide from Surface and Ox Hair from Guide
8. ใส่ภาพ Bitmap ขาว-ดำ ที่เรา paint เตรียมเอาไว้ลงในตำแหน่งตามภาพ
เส้นผมจะเปลี่ยนแปลงไปโดยขึ้นเฉพาะตำแหน่งที่เป็นสีขาวของภาพและจะถูกกั้นในส่วนที่เป็นสีดำของภาพ
8. Choose painted black and white bitmap into position as defined
Then the hair will be only changed where picture is white color and separate the black.
9. จะได้เส้นผมที่ขึ้นตามตำแหน่งที่เราต้องการ
9. After that you will get the hair where you are desired.
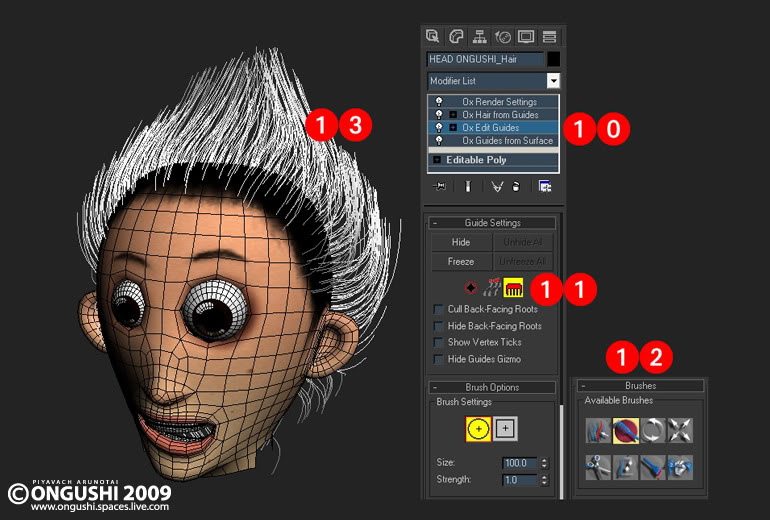
10.ไปที่คำสั่ง Ox Edit Guides
10. go to Ox Edit Guides
11.เลือกไอคอนรูปหวี
11. then choose icon (shown as comb icon)
12.ใช้เครื่องมือจัดแต่งทรงผมจากกล่องเครื่องมือ
อันนี้แล้วแต่ถนัดเลย จะตัด หวี เซ็ท ซอย หมุน ยืด ทำโรลได้ตามต้องการ ลองเล่นดูครับ
12. and select hair style decoration from the tool box.
So make it as you wish…try it. Such as cut, curl, dry, shape, etc.
13.สลวยสวยเก๋
13. Fabulous!
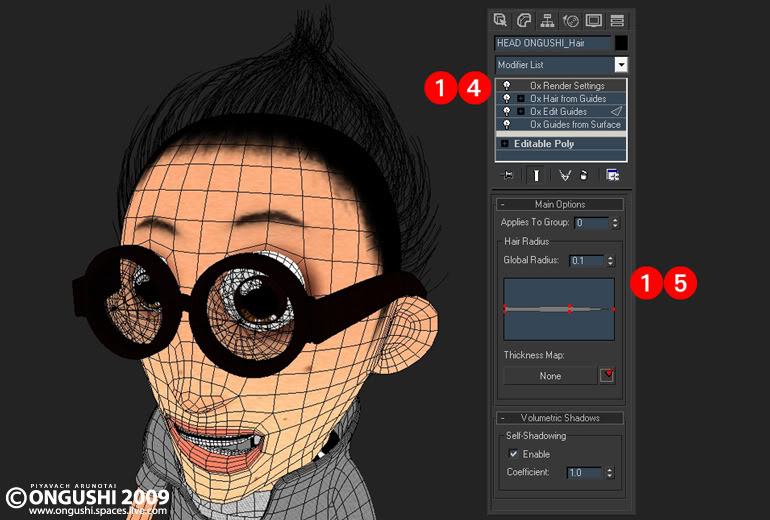
14.ไปที่คำสั่ง Ox Render Settings
14. Go to Ox Render Setting
15.ปรับแต่งขนาดเส้นรอบวงและรัศมีของเส้นผม
15. then adjust for circle and radius of the hair line size
เรามาดูชุดคำสั่งที่ควรรู้อื่นๆ
What's next? … Let's see other commands
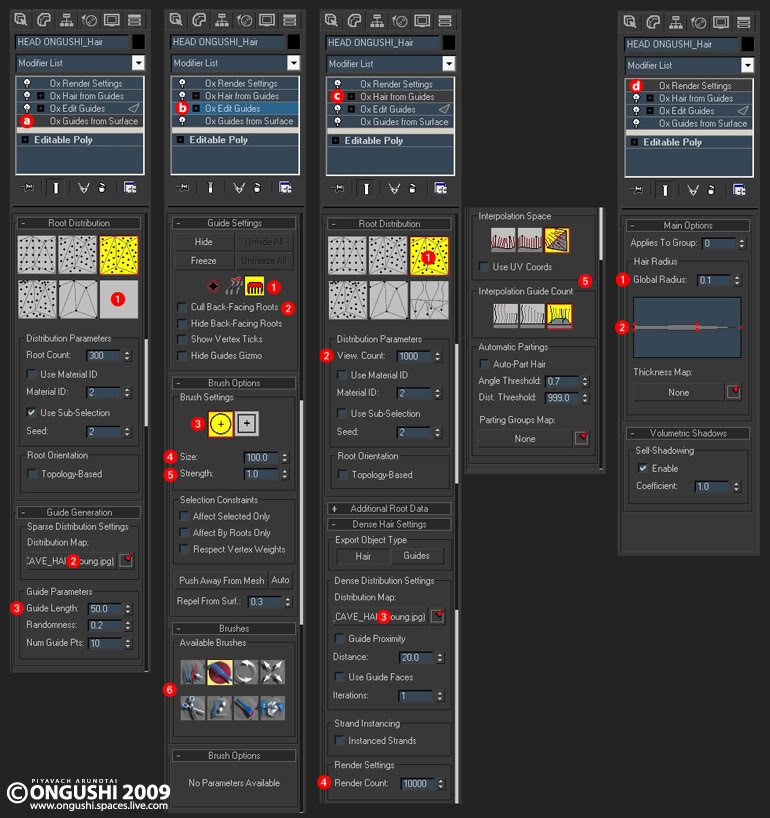
a.Ox Guides from Surface
a1.Root Distribution - รูปแบบของรากผมหรือการสุ่มตำแหน่งของเส้นผม
a1.Root Distribution – hair root style or the random of hair position
a2.Guide Generation - ช่องใส่ภาพ Bitmapขาว-ดำ เพื่อใช่กั้นตำแหน่งผม
a2.Guide Generation - box for choosing black and white bitmap picture
a3.Guide Length - ความยาวของเส้นผม
a3.Guide Length – Hair length
b.Ox Edit Guides
b1.brush - ตัวเลือกเพื่อเข้าสู่กล่องเครื่องมือจัดแต่งทรงผม
b1.brush – menu for hair styling tool box
b2.Cull Back-Facing Roots - คำสั่งเปิด-ปิดให้จัดแต่งทรงผมเฉพาะส่วนด้านหน้าของ viewport ที่เราทำงานอยู่
b2.Cull Back-Facing Roots - menu open-close for hair styling to show front of viewport only when we're working
b3.Brush setting - รูปแบบของขอบเขตการจัดแต่งทรงผมหรือรูปแบบของหัวแปรงนั่นเอง
b3.Brush setting – Brush style or range of hair styling
b4.size - ขนาดของหัวแปรง
b4.size – Brush size
b5.Strenght - ความแข็งของหัวแปรง
b5.Strenght - Brush strenght
c.Ox Hair from Guides
c1.Root Distribution - รูปแบบของรากผมหรือการสุ่มตำแหน่งของเส้นผมนั่นเอง
c1.Root Distribution – hair root style or the random of hair position
c2.View Count - จำนวนเส้นผมที่จะโชว์ใน viewport
c2.View Count - number of hair line shown in viewport
c3.Dense Hair Setting - ช่องใส่ภาพ Bitmap เพื่อใช่กั้นตำแหน่งผม
c3.Dense Hair Setting - Box for choosing bitmap picture that use for dividing hair position
c4.Render count - จำนวนเส้นผมที่จะเรนเดอร์
c4.Render count – number of hair line that will be rendered.
c5.Interpolation - รูปแบบการเรียงตัวของเส้นผม
c5.Interpolation – ordering style of each hair line
d.Ox Renderer Setting
d1.Global Radius - รัศมีของเส้นผม
d2.กำหนดขนาดเส้นรอบวงของเส้นผม
d2.size of circle and radius of hair line setting
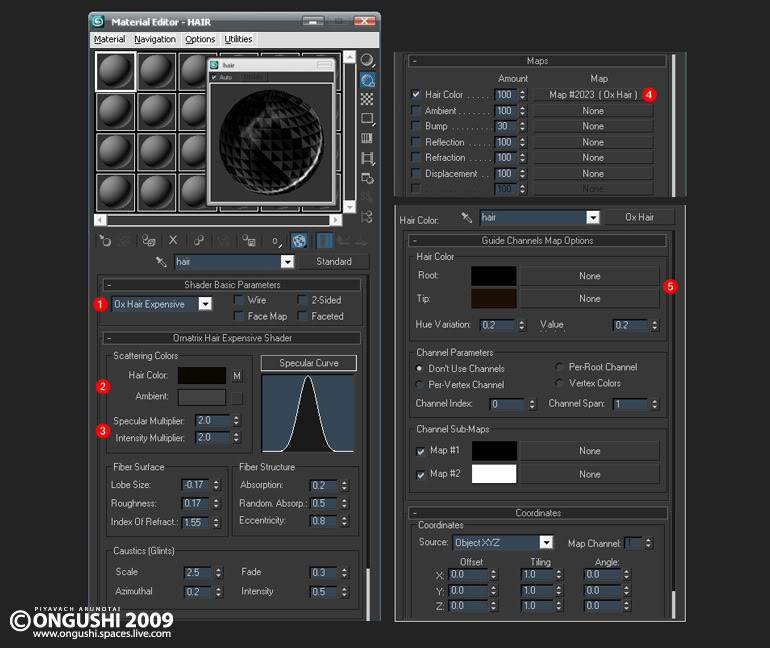
HairFx Material
1.เราเลือก Shade เป็นแบบ Ox Hair Expensive เป็น shade ที่โอกี้ว่าเงางามสวยดี
1.Recommend to choose shade as Ox Hair Expensive I think it's so vanish and beautiful
2.Scattering Color ประกอบด้วยสีของเส้นผมและสีของบรรยากาศที่มีผลต่อเส้นผม
2.Scattering color is composed of hair color and environment color effected to the hair
3.ค่าความเงางามและความหนักแน่นของเส้นผม
3.Shade value and firming of hair
4.เราเลือกสีของเส้นผมเป็นแบบ Ox Hair
4.Choose hair color as Ox Hair
5.ตัวเลือกสีที่รากผม (Root) และสีที่ปลายผม (Tip)
5.then choose color for the root and tip of hair